Appearance
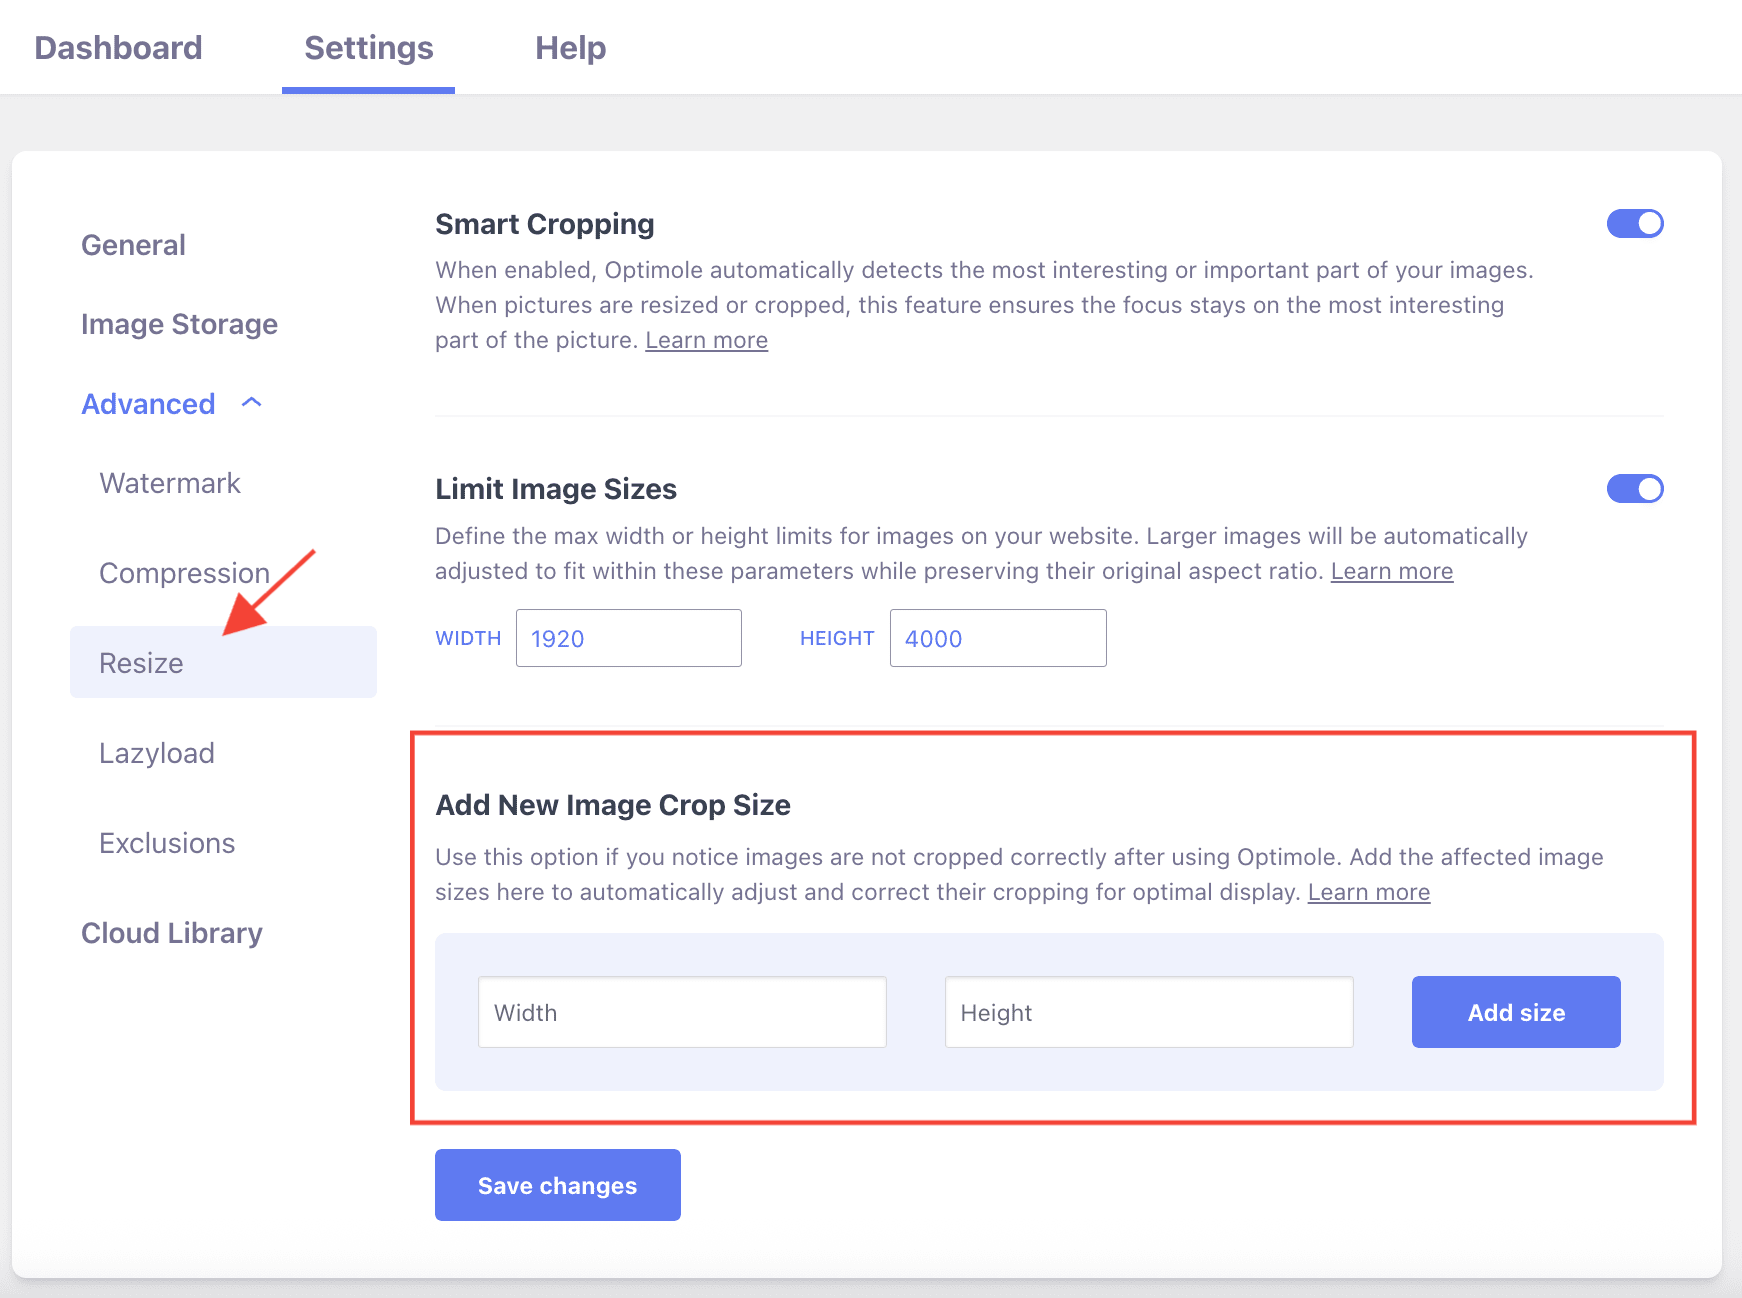
Add New Image Crop Size
The Add New Image Crop Size feature is designed to address situations when images aren't cropped correctly after optimization. This option allows you to register specific image dimensions that your WordPress theme uses, ensuring Optimole crops and optimizes images at exactly those sizes for consistent display across your website.
In this article
When to Use This Feature
Use this feature when:
- Your theme registers custom image sizes that aren't being properly optimized by Optimole
- Images appear incorrectly cropped or blurry at specific dimensions
- You've added custom image sizes to your theme's
functions.phpusingadd_image_size() - Your theme documentation mentions specific image dimensions for features like hero images, product thumbnails, or blog grids
Note: This is different from the Limit Image Sizes feature, which sets maximum dimensions for all images. Add New Image Crop Size registers specific dimensions that your theme actively uses.
How to Find Your Theme's Image Sizes
Before adding a crop size, you need to identify what dimensions your theme uses. Here are three methods:
Method 1: Check Your Theme Documentation
Most premium themes document their custom image sizes. Look for:
- Setup guides or installation documentation
- A section about "Image Sizes" or "Recommended Image Dimensions"
- Common examples:
1200x600for hero banners,400x300for blog grids,800x800for product images
Method 2: Inspect Your Theme's Code
- Navigate to Appearance > Theme File Editor
- Open
functions.php - Search for
add_image_size- you'll see entries like:phpThe size name isadd_image_size( 'blog-grid', 600, 400, true );blog-grid, dimensions are600x400
Method 3: Use a Code Snippet to List All Sizes
- Install the Code Snippets plugin or add this to your theme's
functions.php:phpadd_action('admin_init', function() { echo '<pre>'; print_r(wp_get_registered_image_subsizes()); echo '</pre>'; }); - Visit your WordPress dashboard - you'll see all registered image sizes with their dimensions
Example output:
[blog-grid] => Array
(
    [width] => 600
    [height] => 400
    [crop] => 1
)
This shows a 600x400 image size that should be added to Optimole.
Enable the Feature
Once you've identified the image sizes your theme uses, follow these steps:
1. Navigate to WP Dashboard > Optimole.
2. Open the Settings tab.
3. Expand the Advanced accordion and open the Resize panel.
4. In the Add New Image Crop Size fields, enter the width and height you identified (e.g., 600 and 400).
5. Click Add size to register the size. Repeat for each custom size your theme uses.
Real-World Example
Let's walk through a common scenario:
Scenario: You're using an e-commerce theme that displays product thumbnails in a grid. The theme's documentation says it uses 500x500 images for product grids, but your product images look blurry or oddly cropped.
Solution:
Identify the size: Check your theme's
functions.phpand find:phpadd_image_size( 'product-grid', 500, 500, true );This confirms the theme uses
500x500pixels.Add to Optimole:
- Go to Dashboard > Optimole > Settings
- Expand Advanced > Resize
- Enter Width:
500, Height:500 - Click Add size
Result: Optimole now generates perfectly cropped and optimized
500x500versions of your product images, matching exactly what your theme expects.
When would you need multiple sizes?
If your theme uses different dimensions for different areas:
- Product grid thumbnails:
500x500 - Featured products on homepage:
800x600 - Product quick-view popups:
1200x1200
You would add all three sizes to ensure optimal display everywhere.
User Site and Image Impact
This feature ensures that images are optimized at the exact dimensions your theme requires. Instead of Optimole generating arbitrary sizes, it creates versions that match your theme's specifications, resulting in:
- Perfect cropping - images fit exactly as your theme designer intended
- Better image quality - no unnecessary scaling or distortion
- Faster loading - optimally sized images for each use case
- Consistent appearance - all images maintain uniform dimensions across your site
Example: If your blog theme displays featured images at 1200x600, adding this size ensures every blog post has a perfectly cropped hero image instead of poorly cropped or stretched images.
Benefits and Trade-offs
Benefits
- Visual consistency - images appear uniform across all pages and layouts
- Improved performance - right-sized images load faster than oversized ones
- Theme compatibility - ensures Optimole works seamlessly with theme-specific image requirements
- Professional appearance - eliminates blurry or incorrectly cropped images
Trade-offs
- Requires investigation - you need to identify your theme's image sizes first
- Storage consideration - each registered size creates an additional optimized version (though this is handled efficiently by Optimole's CDN)
Use Cases
The feature can be very advantageous for multiple use cases, such as:
- Blog thumbnails - ensure blog post thumbnails are consistently cropped at the exact size your theme expects (e.g.,
400x250for grid layouts) - Product galleries - perfect the cropping of product images in e-commerce galleries (e.g.,
500x500for square grids,600x800for portrait layouts) - Hero/banner images - maintain proper dimensions for header images and sliders (e.g.,
1920x600for full-width banners) - Profile pictures - maintain uniform cropping for user profile pictures (e.g.,
150x150or300x300) - Portfolio grids - ensure portfolio items display consistently (e.g.,
800x600for landscape projects)
Related Settings
- Smart Cropping - doc - Automatically identifies the most important part of images when cropping. Works together with Add New Image Crop Size to ensure focal points are preserved.
- Limit Image Sizes - doc - Sets maximum dimensions for all images globally, different from registering specific theme sizes.
Useful Resources
You may find useful these guides:
- WordPress Image Sizes: What They Are and How to Change Them
- How to Bulk Edit Featured Images in WordPress
- WordPress Developer Reference: add_image_size()
Still looking for an answer? Contact us!